5.2 Parameter-Editing Dialogs
In the previous topic you learned how to pass parameters into subcircuits. Editing those parameters was awkward at best with the user having to double click through two dialogs. Additionally, there is no error checking the user's input, whatever the user enters is faithfully reproduced in the netlist and deck files.
In this topic you will be introduced to general purpose parameter editing dialogs. These dialogs have the advantage of being customizable and offer means for parameter value checking. For example parameter values can be limited to a certain range of values. Using these general purpose dialog functions, you can make easy to use schematic components which are also reusable in other designs.
To download the examples for Module 5, click Module_5_Examples.zip.
In this topic:
Key Concepts
This topic addresses the following key concepts:
- There are three general purpose parameter editing dialogs in SIMPLIS.
What You Will Learn
In this topic, you will learn the following:
- The three functions for creating parameter-editing dialogs that allow you to edit
symbol properties:
- NewValueDialog
- TabValueDialog
- RadioSelectWidgetStackDialog
- The difference between these three parameter-editing dialog functions
- The types of controls available with each parameter-editing dialog
- Which control types allow you to limit the values of the edited parameters to a range that is compatible with the model.
Overview
In section 5.0 and 5.1 you learned how to parameterize subcircuit symbols. At the end of 5.1 Passing Parameters Into Subcircuits Using the SIMPLIS_TEMPLATE Property, you created a symbol with parameters that can be edited by double clicking on the individual symbol properties. The next logical progression is to add a parameter-editing dialog so that all parameters can be edited in one place. SIMetrix/SIMPLIS has three different dialog functions for general purpose parameter editing. These dialog functions can be added to any symbol to edit the symbol properties that are passed as model parameters to the subcircuit model.
NewValueDialog Method
The basic parameter-editing dialog method is based on the script function NewValueDialog and is used to edit most parameterized devices in SIMetrix/SIMPLIS. The NewValueDialog parameter-editing controls can be one of five types, which are described in the table below.
| Type | Example Control | Application |
| Real |

|
General parameters whose values can be floating point numbers |
| Integer |

|
Parameters whose values must be limited to integers |
| String |

|
Parameter values which are text |
| Boolean |

|
Logical true-or-false parameter values |
| List |

|
Parameters with values that
must be limited to a list of values Although this example uses Y/N, any list of parameter values can be used. |
Creating dialog definitions using the NewValueDialog method is covered in 5.2.1 Adding Basic Parameter-Editing Dialogs. In that section of the tutorial, you will use a dialog for the parameterized RC filter circuit, which is a flat dialog without tabs and is similar to the following:
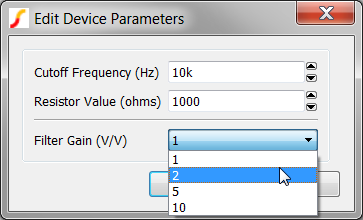
In the dialog above, the list-control type is used to edit the Filter Gain parameter. In this example, the control limits the gain to a list of values: 1, 2, 5, or 10. You can also limit the values using the real and integer control types. The fact that parameter-editing dialogs can limit the parameter values to ranges that are compatible with the model is a distinct advantage. The NewValueDialog function first divides the controls by type and then populates the dialog in the order the controls are defined.
The NewValueDialog function is described in the NewValueDialog Function topic in the SIMetrix/SIMPLIS Script Manual.
TabValueDialog Method
The TabValueDialog parameter-editing method allows you to organize parameter-editing controls on multiple tabs and to define the locations of each control and is therefore more complex than the basic NewValueDialog method. The benefits of using this method will become apparent in section 5.2.2 Adding Tabbed, Parameter-Editing Dialogs.
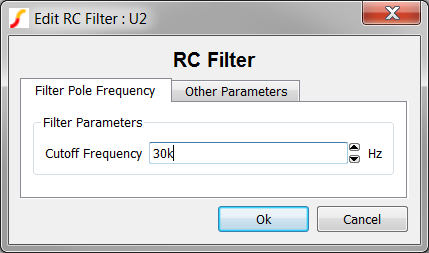
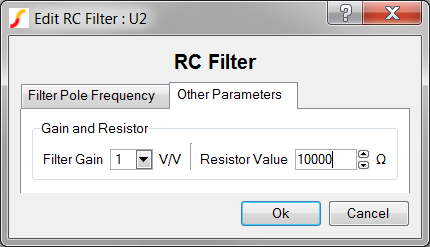
Starting with release 7.20, this dialog function is used to edit all SIMPLIS digital devices except the family of logic gates. This method gives you complete control over the location of the parameter-editing controls, first on the tabs you define and then inside the group boxes on those tabs. This method also provides a dialog title and caption which includes the reference designator of the part being edited. The dialog shown below is configured for the parameterized RC filter circuit; this version uses the TabValueDialog function and is shown in the two images below with one for each tab to illustrate how the controls are arranged on multiple tabs.
In addition to the standard editing controls used in the NewValueDialog based definitions, the TabValueDialog has three additional editing controls: Group, Checkable Group and Label. The eight parameter-editing controls available with this dialog function are described in the following table:
| Type | Example Control | Application |
| Real |
|
General parameters whose values can be floating point numbers |
| Integer |
|
Parameters whose the values must be limited to integers |
| String |
|
Parameter values which are text |
| Boolean |
|
Logical true-or-false parameter values |
| List |
|
Parameters with values that
must be limited to a list of values Although this example uses Y/N, any list of parameter values can be used. |
| Group Box |
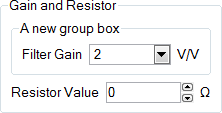
|
A plain group box inside a
main group box that does not return a value but allows you to group
parameters inside other group boxes. The group box with the title "A new group box" is a Group Box parameter-editing control. |
| Checkable Group |

|
A group box with a check
box that returns a Boolean value and enables or disables
all
parameter-editing controls inside the group box The group with the title "Limit maximum off resistance" is a Checkable Group. |
| Label |

|
A text label which has no
return value but is passed into the dialog as a description of another
parameter-editing control The text, "Clk to Output Delay" is a Label parameter-editing control placed in the third row on the grid. |
RadioSelectWidgetStackDialog Method
The RadioSelectWidgetStackDialog parameter-editing method uses the same parameter editing controls as the TabValueDialog. The difference is that the dialog has a master parameter which controls which tab is visible. This master parameter is defined using a radio button, and the dialog automatically brings the tab of parameters into focus based on the selected radio button. In module 6 you will use this dialog method to create a parameter editing dialog for a programmable load. The master control parameter is the LOAD_TYPE, which can be one of Constant Resistance, Constant Current, or Constant Voltage. Each parameter value has a separate tab of parameter-editing controls, and only one tab of controls is visible at a time. The RadioSelectWidgetStackDialog is particularily useful for "one of many" models, where the model takes on various forms based on a master parameter.
Selecting a Dialog Method
Three factors can drive your decision on which dialog method to use:
- The amount of time you have to define the dialog:
- Defining a TabValueDialog or RadioSelectWidgetStackDialog definition takes more time, although the spreadsheet used in section 5.2.2 Adding Tabbed, Parameter-Editing Dialogs aids in defining the dialogs.
- The NewValueDialog method is faster to define.
- The number of parameters you need to edit:
- If you have more than 20 parameters, the NewValueDialog approach creates a large, flat dialog that can be difficult to understand and to navigate.
- The TabValueDialog has been used to edit models with more than 100 parameters. By grouping the controls of related parameters, the dialog is easier to understand and to navigate.
- The visibility of the symbol to your customers:
- The TabValueDialog method produces a more refined dialog, well-suited for IC models.
In the next two topics, you will learn how to define parameter-editing dialog definitions.
Conclusions and Key Points to Remember
- Adding a parameter-editing dialog allows a user to edit model parameters quickly.
- Three parameter-editing dialog methods are available in SIMetrix/SIMPLIS: